
How To Use QuickBooks Clean Install Tool In Three Stages?
Since the clean install tool finds its significance in many operating frameworks, we will cover the basics associated with this tool. Hence, you can count on this guide for fruitful information regarding your QB framework. Moreover, you can dial our helpline number 1-888-858-6199 to speak to our QB ProAdvisors via phone call. Our QB ProAdvisors operate round the clock to assist you with your QB-related queries.
What Is The Significance Of QuickBooks Clean Install Tool?
The tool fixes system glitches by clearing undesired cache memory from the system. You can look for the framework if you sense any of these system glitches: Frequent occurrence of installation errors.
Things To Consider Before Using QuickBooks Clean Install Tool
Since the tool clears up unnecessary memory from your system, you must save the essential files in a safe location. Moreover, you must know the following things before using the QuickBooks clean install tool:
Create A Local Backup Of Company Files
- First, insert a flash drive into the system to initiate the backup process.
- Afterward, open the QB Desktop to select the desired files for the backup.
- Now, click on the “File” menu.
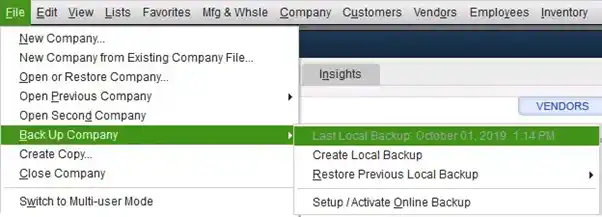
- Then, hit on the “Backup Company” option to prepare a local backup.
- At this point, you can choose between a local backup or an online backup.
- Followed by this, hit the “Next”‘ option.
- Lastly, go with the on-screen prompts to complete the backup creation.
Create A Local Backup Of Company Files
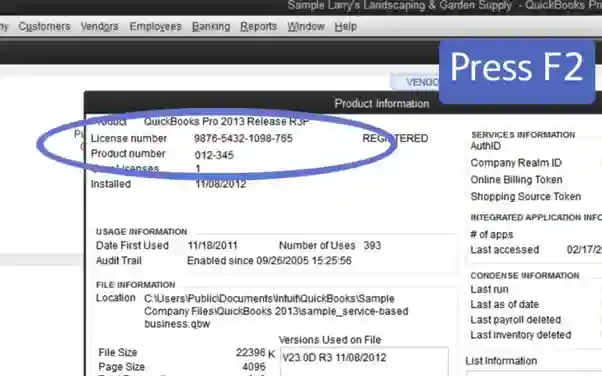
After uninstalling the QB software, you should keep the product and license number handy. It will help you reinstate essential files to your installed version. You can open the product information window by clicking the F2 key or pressing the Ctrl + 1 keys together.
How To Install And Use QuickBooks Clean Install Tool?
The process of software re-installation involves the following three steps:
- Uninstalling QB Desktop.
- Use the QuickBooks Clean Install tool for Windows-specific versions.
- Re-installing QB Desktop.
First Step: Uninstalling QuickBooks Desktop
The first step involves the uninstallation of QB Desktop, which you can do in the following steps:
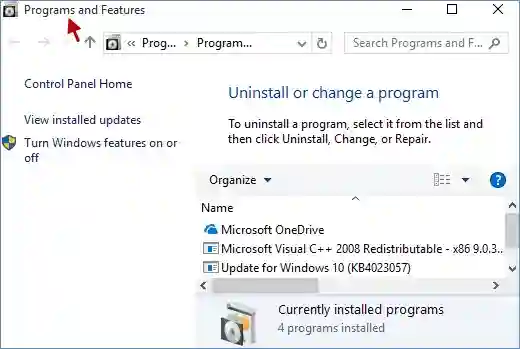
- First, simultaneously click the Windows + R keys to open the “Run” command dashboard.
- Afterward, open the search bar, write “Control Panel, ” and press enter.
- Now, move to the “Programs and Features” option.
- At this point, select the “Uninstall a Program” option featured in the menu section.
- Later on, click on the “QuickBooks Desktop” option.
- Subsequently, hit the “Uninstall” key.
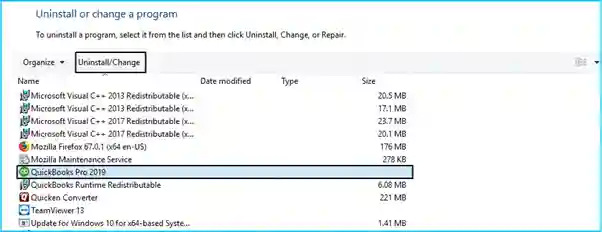
- Finally, follow the on-screen prompts to conclude the uninstallation procedure.
Second Step: Use QuickBooks Clean Install Tool To Clear Up System Files
- First, download the QuickBooks tool hub from Intuit’s official website.
- Afterward, move to the section where you saved the downloaded file.
- Then, open the downloaded file by double-clicking it.
- Subsequently, follow the instructions to install the program on your system.
- Here, you must accept the licensing terms after reading through them.

- Now, open the QuickBooks Tool Hub application on your computer.
- Further, navigate to the “Installation Issues” tab.
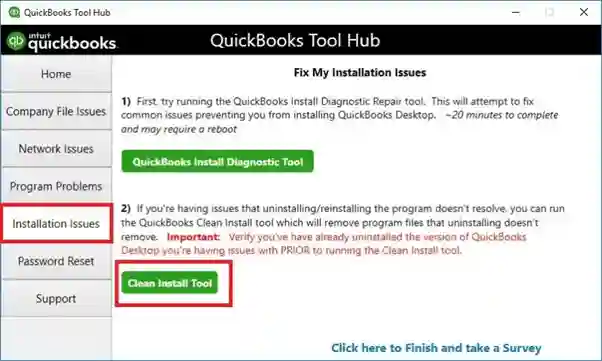
- Followed by this, click on the “Clean Install Tool” option.
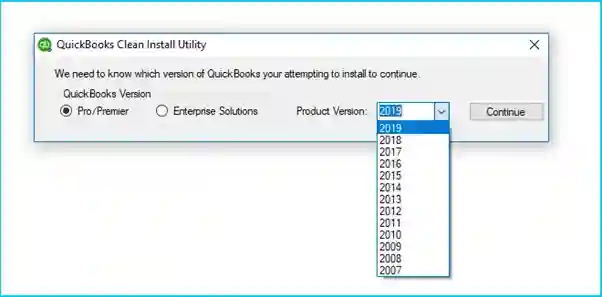
- At this point, select the QB Desktop version and hit the “Continue” tab.
- Consequently, the error message- “Please install your copy of QB to the default location” will appear on your screen.
- Lastly, hit the “Ok” key to sum up this process.
If it shows some error, proceed with the following steps:
- First, open the “Windows Taskbar.”
- Afterward, click the “Processes” tab and select the image title.
- Choose Exe, QBDBMgern.exe, QBW32.exe, QBCFmonitorservice.exe, and then the “End” tab.
- Finally, click on the “Yes” key to check further issues.
Third Step: Re-installation Of QB Desktop
The third step involves the re-installation of QB Desktop on your system. Here, you have to submit the product and license numbers. So, it will help if you keep that data handy at your desk. Further, the process involves the following steps:
● First, insert the QB Desktop’s CD and install the software per the on-screen instructions.

- Afterward, submit the product and license number.
- Moreover, submit the account credentials as asked in the dialogue box.
- Then, follow the on-screen prompts to proceed further.
- Subsequently, hit the “Next” tab and move to the stage of the installation.
- Here, you will have to click on the “Install” tab.
- Lastly, run the QuickBooks Desktop application.
Manual Mode To Rename The QuickBooks Desktop Installation Folders
- First, open the “Start” menu.
- Afterward, open the “File Explorer” menu.
- Now, search and open the folder containing the company files.
- For 32-bit version C:\ Program Data \ Intuit \ QuickBooks (year)
- C:\ Users \ (current user) \ App Data \ Local \ Intuit \ QuickBooks (year)
- C:\ Program_Files \ Intuit \ QuickBooks (year)
- For 64-bit version C:\ Program Files (X86) \ Intuit \ QuickBooks
- Later, search for the folder and click the “Rename” tab.
- Further, add “.old” as the domain of the desired folder.
(It can prevent QB Desktop from accessing the folder after re-installation.)
- Then, re-install the QB Desktop software on your computer.
Further, if you get this error message- “Access denied to rename the folder,” follow these steps:
- First, open the task manager by pressing Ctrl + Shift + Esc keys.
- Afterward, click on the “Processes” tab.
- Now, arrange the list by using the “Name Column Header.”
- Subsequently, look for your system-specific QB process from the processes tab. Some of these may involve-
- Initial, QBW32.exe,
- QBDBMgrN.exe,
- QBDBMgr.exe,
- And QBCFMonitorService.exe

- Finally, click the “End Process” tab to conclude the process.
Wrapping It Up
In conclusion, the QuickBooks Clean Install tool is an excellent feature you can use to enhance your system performance. Further, we covered all aspects of this tool-based facility for your QB purposes. Hence, you can refer to this guide if you face any issues related to software performance.
Nevertheless, the tool-based utility window comes with multiple features it feels tricky sometimes. Hence, if an issue persists on your system, you can speak to our QB ProAdvisors. For this purpose, you can either dial the toll-free number 1-888-858-6199 or check the live chat facility.
Frequently Asked Questions
The QuickBooks Clean Install tool is an added facility that allows you to fix system glitches by:
- Clearing unwanted cache memory
- Helping improve system performance
- And Resolving errors in QuickBooks Desktop
The QuickBooks Clean Install tool resolve glitches in the following ways:
- First, it clears unnecessary memory from your system.
- Second, it resolves installation errors.
- Third, it fixes errors in multi-user network mode.
- Fourth, it troubleshoots issues that are non-fixable by simple re-installation.
It will help if you consider the following things before using the tool:
- First, save essential files on a local drive.
- Second, create a local backup of company files.
- Third, keep the product and license numbers handy for reinstatement.
You can use the QuickBooks Clean Install tool in three stages:
- First, uninstall QuickBooks Desktop.
- Second, use the tool to clear system files
- Third, re-install QuickBooks Desktop on your system